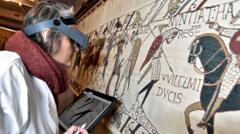
The Bayeux Tapestry operates not as a passive decorative textile, but as a sophisticated multimedia instrument of statecraft designed to legitimize a contested regime. Produced in the immediate aftermath of the 1066 Norman Conquest—likely commissioned by William the Conqueror’s half-brother, Bishop Odo of Bayeux, and executed by highly skilled Anglo-Saxon embroiderers—the 70-meter linen artifact functions as an 11th-century white paper. By analyzing the structural mechanics of its narrative architecture across five critical junctures, we can decode how the Anglo-Norman elite deployed visual syntax, deliberate structural omissions, and symbolic code to manufacture consensus and engineer political legitimacy.
The Strategic Mission: Narrative Anchoring and Pre-Invasion Diplomacy
The baseline narrative establishes the legal foundation of the Norman claim, serving as the opening mechanism of the document's broader causal chain. In this initial phase, King Edward the Confessor dispatches Harold Godwinson, Earl of Wessex, to Normandy.
The Diplomatic Framework
The Tapestry frames this journey not as a routine aristocratic transit, but as a formal diplomatic mission. The visual elements emphasize Harold’s status as a subordinate executing royal orders. Edward sits on an elevated throne, utilizing a vertical hierarchy to signal supreme authority. When Harold departs, his retinue carries hunting hounds and hawks—the precise diplomatic currency of medieval elites.
The Hidden Friction Points
Norman chroniclers, such as William of Poitiers, asserted that Edward sent Harold specifically to swear an oath confirming William as the rightful heir to the English throne. The Tapestry, however, introduces a calculated ambiguity. The Latin inscription (titulus) reads simply:
EDWARD REX: UBI HAROLD DUX ANGLORUM ET SUI MILITES EQUITANT AD BOSHAM(King Edward: Where Harold, Duke of the English, and his knights ride to Bosham)
By omitting the explicit verbal mandate of the succession from the text, the designers achieved a dual political objective. For a Norman audience, the visual continuity implied a formal mission; for a defeated Anglo-Saxon audience, it avoided an overtly inflammatory fabrication that could incite rebellion. This structural ambiguity demonstrates how the artifact managed domestic information risk while advancing an external geopolitical narrative.
The Relic Oath: Contractual Obligation and Psychological Warfare
The operational pivot of the entire narrative occurs at Bayeux, where Harold swears a sacred oath to Duke William. This scene is engineered to establish the structural cause for Harold’s subsequent destruction.
[Harold's Oath at Bayeux] ──> [Breach of Contract (Coronation)] ──> [Divine Retribution (Hastings)]
The Geometry of Betrayal
The visual composition of this scene relies on precise symmetry to maximize its psychological impact. Harold stands flanked by two distinct reliquaries, his hands extended over holy artifacts. William sits elevated on his throne, holding a sword erect—a direct representation of executive power ready to enforce contractual compliance.
The Legal Leverage Mechanisims
Under 11th-century canon law, an oath sworn on holy relics transcended a mere secular treaty; it was a binding cosmic contract witnessed by the Church. By visually documenting this event, the Norman regime established a multi-layered strategic advantage:
- International Legitimization: It provided the necessary legal and moral grounds for Pope Alexander II to issue a papal bull blessing William's invasion.
- Feudal Subjugation: It reclassified Harold from an independent national sovereign into a personal vassal who had violated the core tenets of feudal fealty.
- Psychological Demoralization: It framed the impending military invasion not as an aggressive war of expansion, but as a punitive expedition executing divine justice against a perjurer.
The Usurpation Crisis: Information Operations and Omens
The transition of power following Edward the Confessor’s death in January 1066 represents a profound crisis of legitimacy. The Tapestry manages this transition through a sophisticated juxtaposition of political theater and astrological propaganda.
+------------------------------------+------------------------------------+
|       Ritual Legitimacy            |         Cosmic Retribution         |
+------------------------------------+------------------------------------+
| - Harold sits on the throne        | - Halley's Comet appears           |
| - Holds orb and scepter            | - Population cringes in terror     |
| - Flanked by Archbishop Stigand    | - Ghostly invasion fleet in border |
+------------------------------------+------------------------------------+
The Problematic Coronation
The scene depicting Harold’s coronation is dense with political signaling. Harold is shown seated with the traditional regalia of state: the crown, the scepter, and the orb. To his right stands Archbishop Stigand. This inclusion is a deliberate, highly calculated character assassination.
Stigand had been excommunicated by the Papacy for holding multiple sees simultaneously (pluralism). By prominently displaying Stigand as the officiating prelate, the Norman designers structurally undermined the legitimacy of the coronation. The visual argument was clear: an illegitimate archbishop can only consecrate an illegitimate king.
Astrological Warfare and Prophecy
Immediately following the coronation scene, the designers introduce Halley’s Comet, which passed over England in April 1066. The Tapestry captures the immediate psychological shockwaves. In the main register, English citizens point toward the celestial anomaly with contorted anatomy signaling dread.
In the lower border directly beneath Harold’s throne, the designers embroidered a faint, ghostly fleet of spectral ships. This architectural placement creates a direct causal link: Harold’s illegitimate assumption of the crown has disrupted the cosmic order, summoning an inevitable maritime invasion as divine retribution.
Logistics as Strategy: The Infrastructure of Mass Invasion
Shifting away from political theology, the Tapestry dedicates substantial real estate to documenting the industrial output and logistics required to launch an amphibious invasion. This section functions as a display of sheer state capacity and resource mobilization.
The Production Function
The narrative breaks down the logistical sequence into distinct operational phases:
- Raw Material Acquisition: Felling trees with specialized broadaxes.
- Manufacturing: Shaping planks and assembling longships directly on the Norman shoreline.
- Supply Chain Management: Transporting heavy chainmail hauberks via poles suspended on men's shoulders, alongside barrels of wine, grain, and armaments.
The Tactical Pivot: Rations and Remounts
A critical observation within this sequence is the transportation of horses. The Normans loaded hundreds of destabilized destabilizing warhorses into open-hulled vessels. This detail highlights the fundamental tactical differentiator of the Norman military machine: the deployment of heavy shock cavalry.
By meticulously illustrating the immense material and financial capital poured into the invasion fleet, the Tapestry communicates an underlying message of inevitability. It demonstrates that the Norman state possessed the administrative sophistication, resource depth, and logistical control required to project overwhelming force across the English Channel.
The Hastings Death Scene: Tactical Collapse and Regime Transmutation
The climax of the artifact presents a clinical breakdown of the tactical mechanics that decided the Battle of Hastings on October 14, 1066. It serves as the final proof for the document's central thesis: perjury leads to total structural collapse.
[Shield Wall Integrity] ──> [Norman Cavalry Shock Tactics] ──> [Decapitation Event (Harold's Death)]
The Attrition Economy
The visual depiction of the battlefield shifts from organized military formations to complete entropy. The upper and lower borders, which previously held ornamental beasts or fables, are now filled with stripped corpses, severed limbs, and discarded weaponry. This layout operates as an accounting of the human cost of the conflict.
The text remains sparse, leaving the kinetic energy of the imagery to convey the message. The Anglo-Saxon shield wall—the traditional defensive formation of the housecarls—is shown under relentless assault by Norman cavalry. This contrasts the rigid, static infantry tactics of the English with the fluid, highly mobile combined-arms strategy of the Normans.
Decoding the Decapitation Event
The scene anchored by the text HIC HAROLD REX INTERFECTUS EST (Here King Harold was slain) is the subject of intense historiographical debate. It features two distinct figures under the inscription:
- Figure A: A standing warrior pulling an arrow from his helmet or eye.
- Figure B: A fallen combatant being hacked down by a Norman horseman's sword.
Whether these figures represent a sequential narrative of Harold’s death or two distinct individuals, the strategic intent of the imagery remains identical. The removal of the English monarch functions as a definitive decapitation event. The death of the king instantly dissolves the political entity of Anglo-Saxon England.
The remaining English forces are shown fleeing into the margins of the textile, leaving the field—and the kingdom—to William. The missing final section of the Tapestry almost certainly concluded with William's coronation at Westminster Abbey on Christmas Day, 1066, completing the transformation of an invading duke into a legitimate king.
Strategic Imperatives for Historical Information Analysis
The analytical value of the Bayeux Tapestry extends far beyond its status as a medieval artifact. It offers a blueprint for how regimes utilize emerging media to control narratives following periods of intense geopolitical instability.
When evaluating historical or contemporary information assets of this scale, analysts must apply three core diagnostic principles. First, establish the identity and economic motives of the hidden patron rather than relying on the perspective of the creators. Second, identify calculated ambiguities within the text where omissions are used to manage domestic political risk. Third, analyze the structural layout of the medium to discern how supplementary imagery is deployed to reinforce the primary argument. By treating cultural artifacts as deliberate information operations, we can peel back layers of institutional propaganda to reconstruct the underlying mechanics of power.